what do you want to use as your public directory firebase storage
Automatically deploy your website to Firebase Hosting with GitHub Actions
For the past few years, I have been using Hugo as a static site generator to build my personal website and hosting the site on Firebase Hosting. Until recently, I've encountered Publish, yet some other static site generator, BUT it lets you build your entire website using Swift! How cool is that!
For this particular tutorial, we will learn:
- create a make new website using Publish
- integrate the firebase hosting GitHub Actions
- preview your website on Firebase Hosting preview channels via GitHub pull requests
- auto deploy your website when pull asking merged
Prerequisites
Earlier nosotros spring in, let'due south first make sure we've prepared all the tools or setups we need.
- Publish
Make certain y'all have publish command available in your local terminal. Luckily, Publish provides an incredibly easy way to install the tool — via Homebrew. Refer to the Installation section on Publish github repo.
❯ brew install publish - Firebase project
Have a Firebase project created for your new website. If not, go to the Firebase console page to create one. If yous already have projects created and wish to apply the existing i, that'due south totally fine. Yous have the option to choose which project to host your website later.
- Firebase CLI
Brand sure the firebase command line tool is installed. If you have Nodejs installed, you can use npm to install it. For more information, y'all can refer to the Firebase CLI reference.
❯ npm install -g firebase-tools Step 1 — Create a new Publish project
Start I take already created a new repository on my GitHub demo-publish-firebase and cloned locally. To create a new Publish projection, cd to the local repo folder and run the following command:
          ❯ publish new
✅ Generated website project for 'DemoPublishFirebase'
Run 'open Package.swift' to open information technology and start edifice
❯ la
total 16
drwxr-xr-10 12 hengwang staff 384B 8 Jan 17:00 .git
-rw-r — r — 1 hengwang staff 56B 8 Jan 17:03 .gitignore
drwxr-xr-x 4 hengwang staff 128B eight Jan 17:03 Content
-rw-r — r — 1 hengwang staff 506B 8 Jan 17:03 Package.swift
drwxr-xr-x two hengwang staff 64B 8 Jan 17:03 Resources
drwxr-xr-x iii hengwang staff 96B viii Jan 17:03 Sources
After the project successfully created, run the command publish run, and y'all volition be able to see your website at localhost:8080.
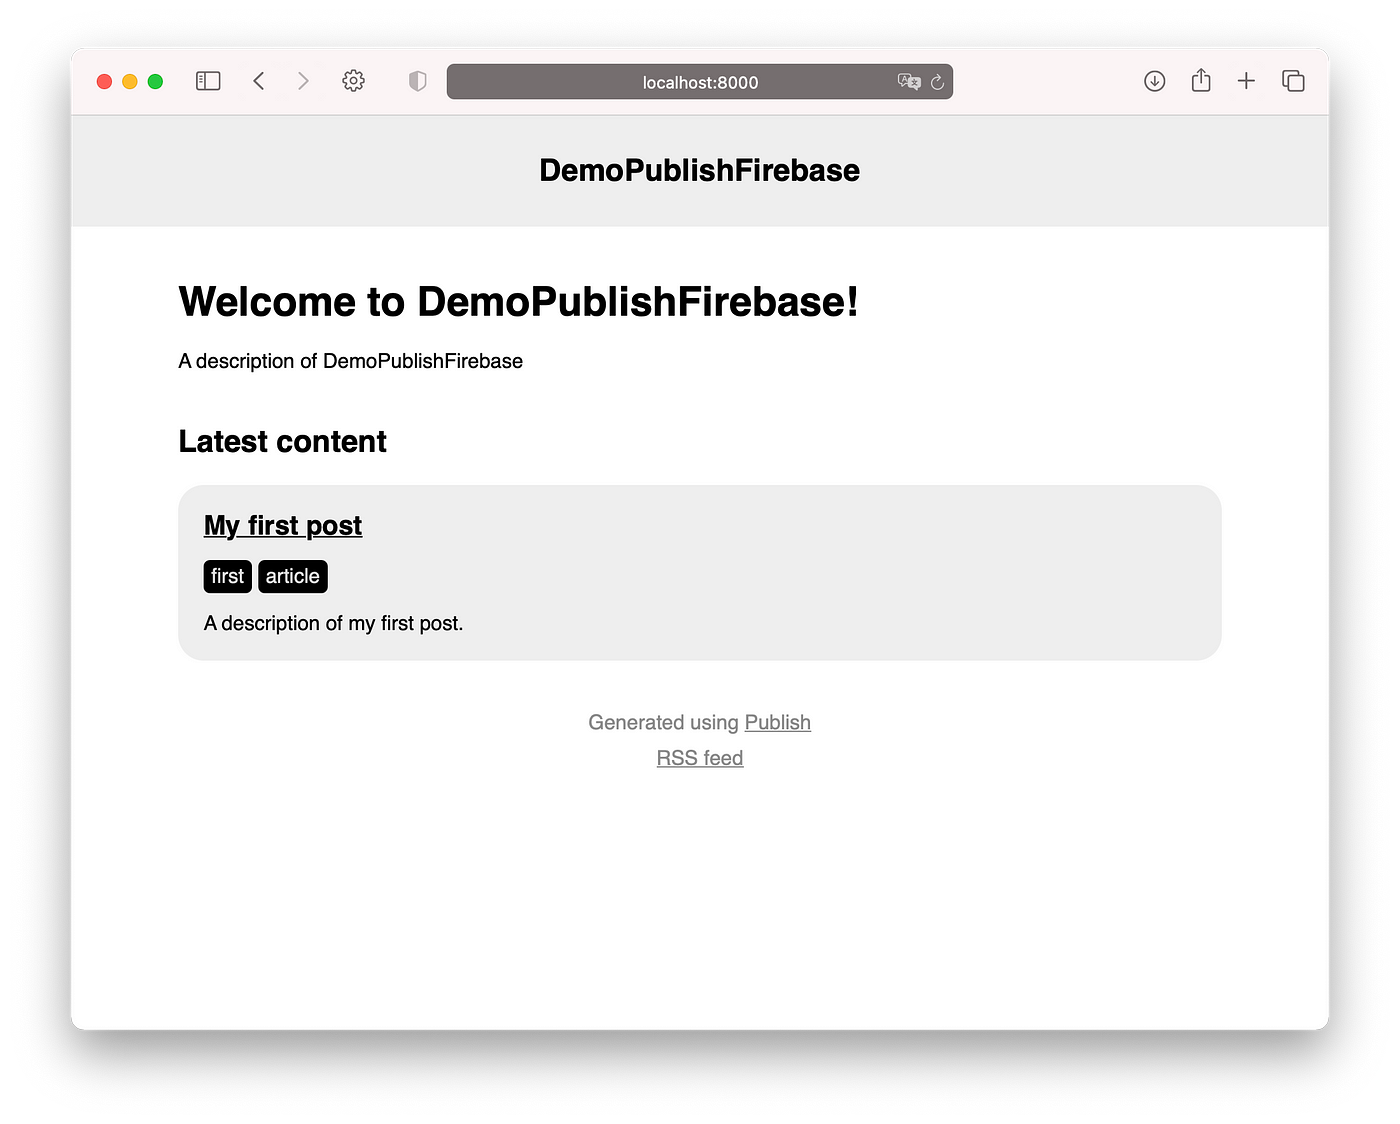
So far and so proficient.
Footstep 2 — Integrate GitHub Deportment to deploy to Firebase Hosting
In your terminal, login to Firebase with control firebase login, follow steps in the prompt window to authenticate your business relationship.
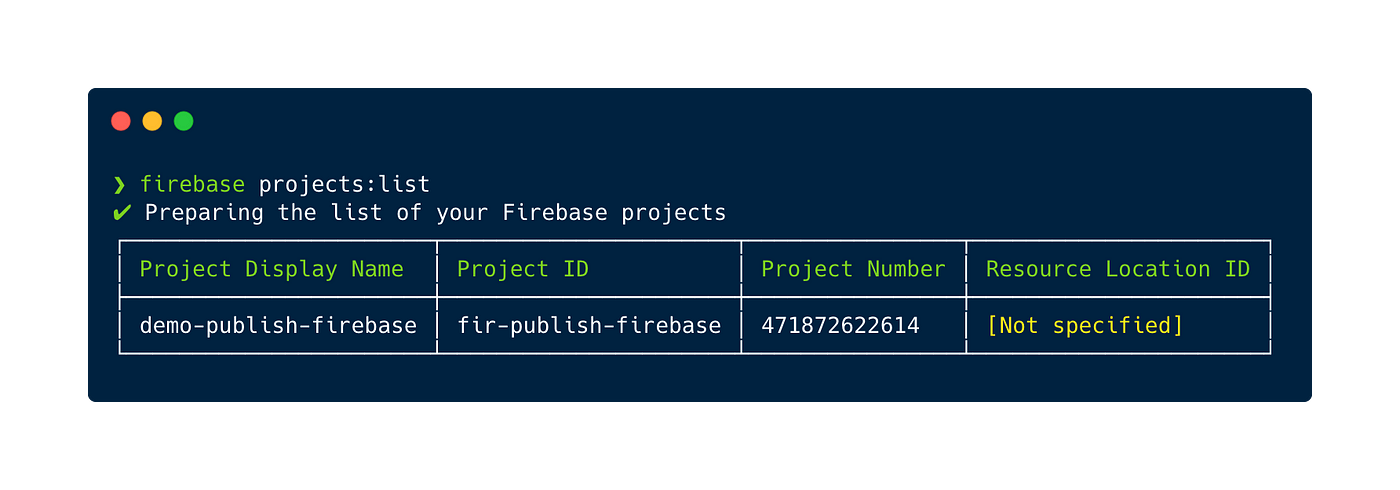
Once logged in, check the projects on your Firebase account using command firebase project:list. Make sure the one you wish to apply for the website exists.
Next volition exist the most important command throughout this tutorial.
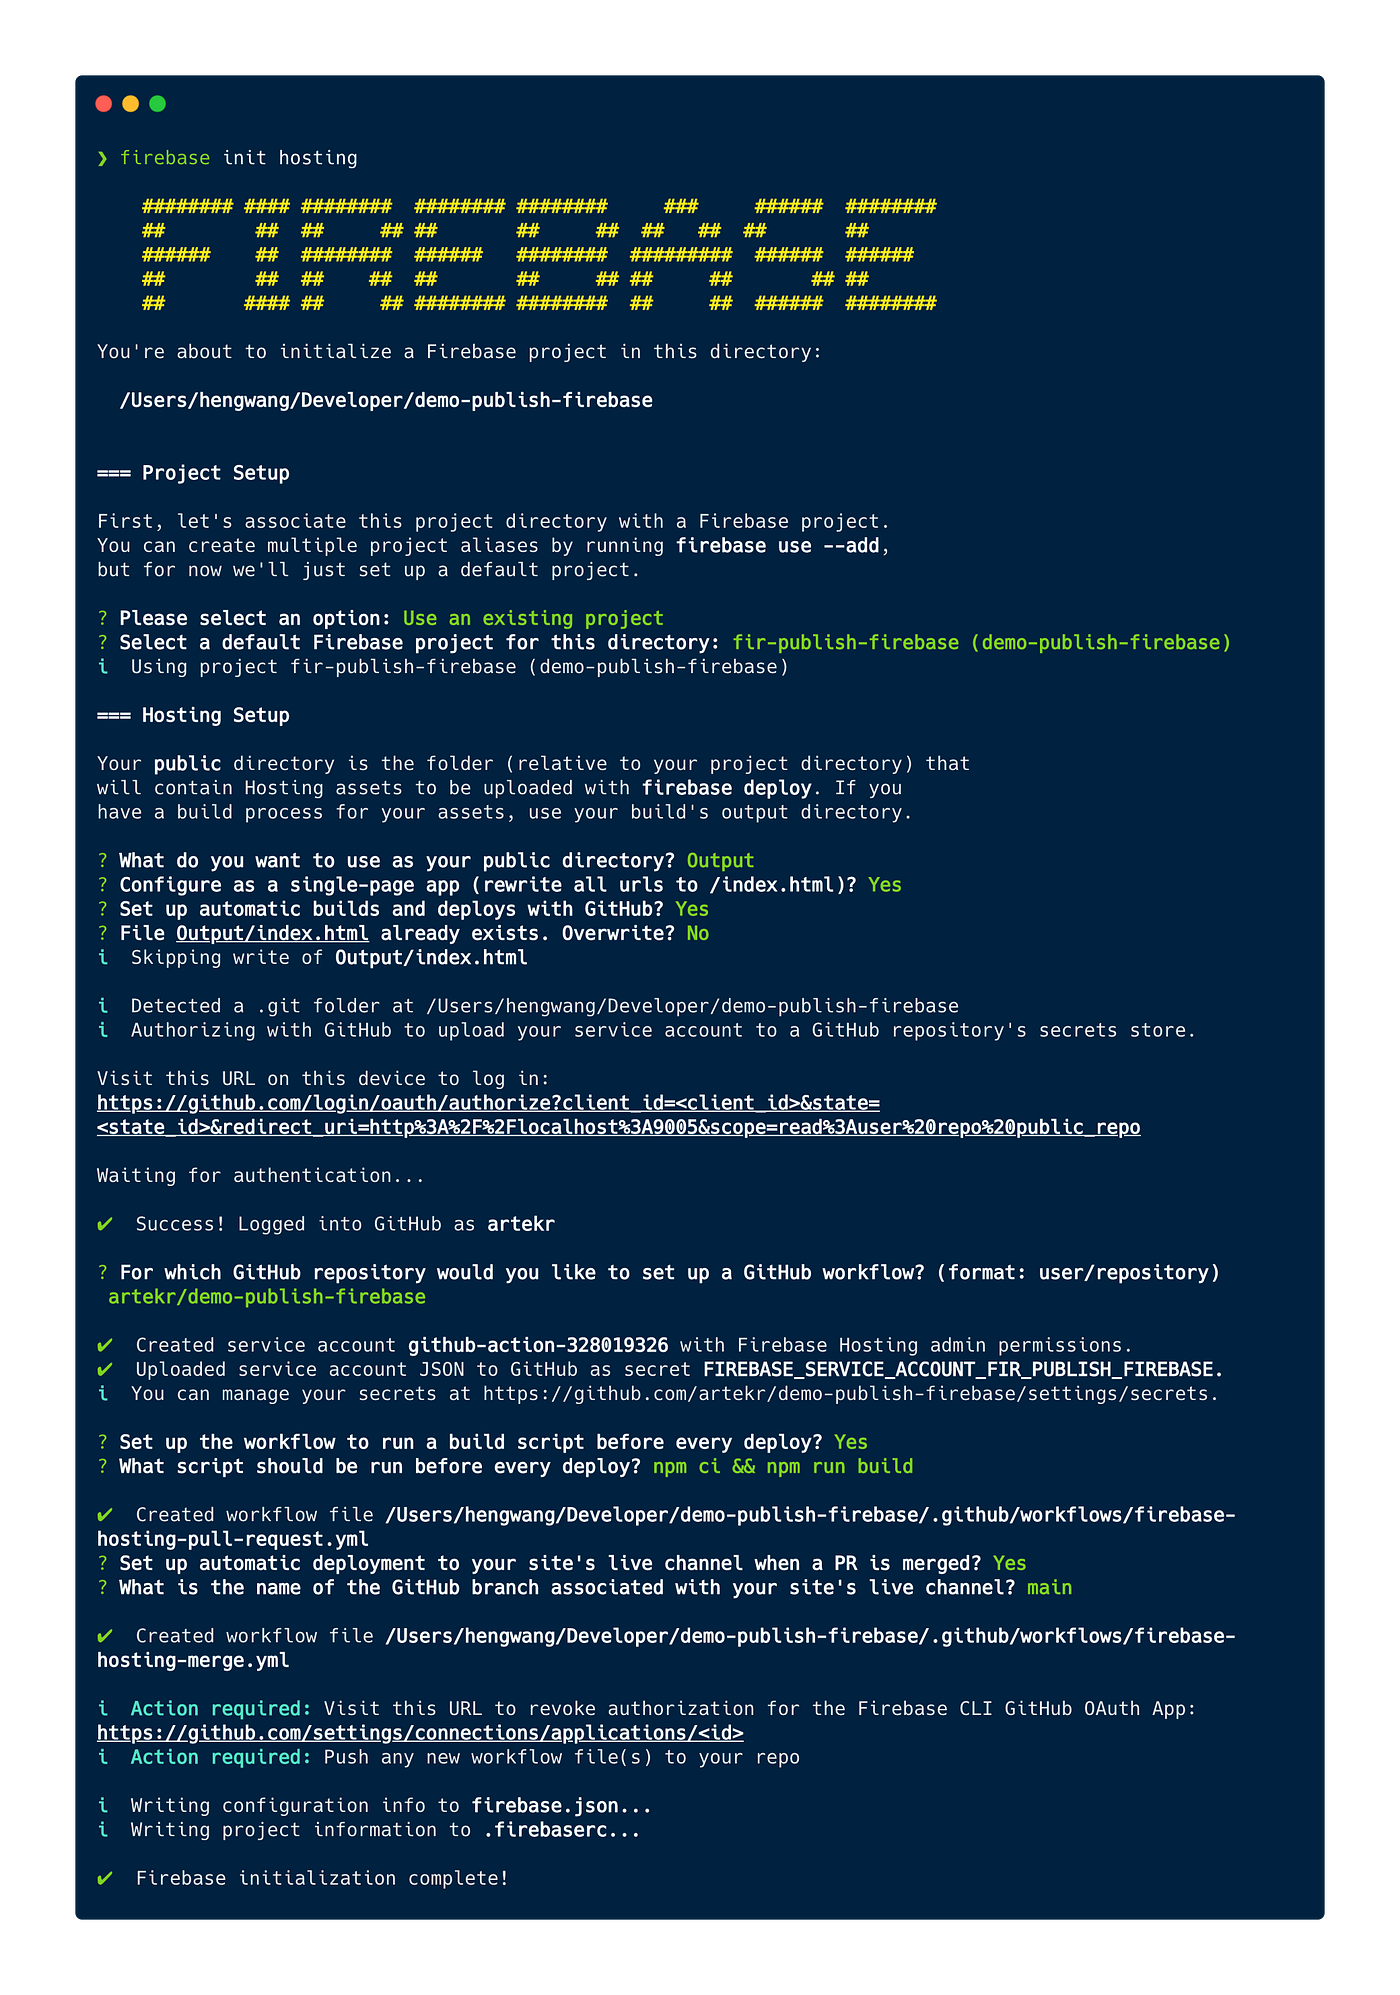
❯ firebase init hosting The command will prompt many questions and somewhen take care of setting up the GitHub Actions automatically. There are few things we need to pay attention to.
For Project Setup, choose Use an existing project and select the proper Firebase project from the list.
          === Project Setup
First, let's associate this projection directory with a Firebase project.
You tin create multiple project aliases by running firebase use — add together,
merely for now we'll only ready a default projection.          ? Please select an option: Utilize an existing project
? Select a default Firebase projection for this directory: fir-publish-firebase (demo-publish-firebase)
i Using project fir-publish-firebase (demo-publish-firebase)
Next is the Hosting Setup.
          === Hosting Setup          Your public directory is the binder (relative to your project directory) that
will incorporate Hosting assets to be uploaded with firebase deploy. If you lot
take a build process for your assets, utilise your build'south output directory.          ? What do you want to use equally your public directory? Output
? Configure equally a single-page app (rewrite all urls to /alphabetize.html)? Yes
? Ready automatic builds and deploys with GitHub? Yeah
? File Output/index.html already exists. Overwrite? No
i Skipping write of Output/index.html
The default public directory will point to the public folder. This binder commonly is generated by the static site generator which basially contains all the resources needed to return your website. The Publish bundle will build and generate the website under Output folder. Then here you demand to manually change to Output every bit the public directory.
Next brand sure you enable Fix up automatic builds and deploys with GitHub?. Finally, the prompt will ask yous if you want to overwrite the Output/index.html, set to No since we want to preserve the page generated by Publish instead of Firebase.
After this step, the CLI will prompt you to authenticate your GitHub business relationship and choose the repo for deployment.
          i Authorizing with GitHub to upload your service business relationship to a GitHub repository's secrets store.          Visit this URL on this device to log in:
https://github.com/login/oauth/authorize?client_id=<client_id>&country=<state_id>&redirect_uri=http%3A%2F%2Flocalhost%3A9005&scope=read%3Auser%20repo%20public_repo          Waiting for authentication…
This step will basically create a service account in your GitHub repo with Firebase Hosting admin permissions and upload service business relationship JSON to GitHub as the repository secrets FIREBASE_SERVICE_ACCOUNT_FIR_PUBLISH_FIREBASE.
Next we need to prepare and create the workflow.
          ? Set up the workflow to run a build script before every deploy? (y/Due north) y
? What script should be run before every deploy? npm ci && npm run build          ✔ Created workflow file /Users/hengwang/Developer/demo-publish-firebase/.github/workflows/firebase-hosting-pull-asking.yml
? Ready automatic deployment to your site'southward live aqueduct when a PR is merged? Yes
? What is the proper name of the GitHub branch associated with your site'southward live channel? main
Nosotros volition leave the script npm ci && npm run build every bit default for now and will update it afterwards. In the concurrently, for the GitHub branch associated with your site'south live channel, you can put main if your GitHub repo was newly created or created recently(Otherwise, information technology might exist set to master every bit the default branch for older repos).
At terminal, if you see the following messages, congratulations! Yous've completed the most critical role of this tutorial.
          i Writing configuration info to firebase.json…
i Writing project information to .firebaserc…          ✔ Firebase initialization complete!
For the full command logs, delight see below.
At this point, you lot should expect to accept ii `.yml` files created for the GitHub Deportment workflows under your project folder.
          ❯ tree -a -50 3 .github
.github
└── workflows
            ├── firebase-hosting-merge.yml
            └── firebase-hosting-pull-request.yml          one directory, 2 files
Step three — Create a pull request to preview your website
We take completed all the code and configurations in order to launch our website. Let's create a pull request in GitHub to test it out.
Create a new branch feat/setup_workflow, commit all the local changes in your project, and push to GitHub. Total commands are showing beneath.
          ❯ git checkout -b feat/setup_workflow
❯ git add .
❯ git commit -thousand "setup workflow"
❯ git button — set-upstream origin feat/setup_workflow
Once the branch is pushed to GitHub, you will see the option to create a pull asking. Click to create the pull asking.

Look for GitHub Actions to complete the workflow. Unfortunately, our start endeavour failed due to a build command npm ci && npm run build.
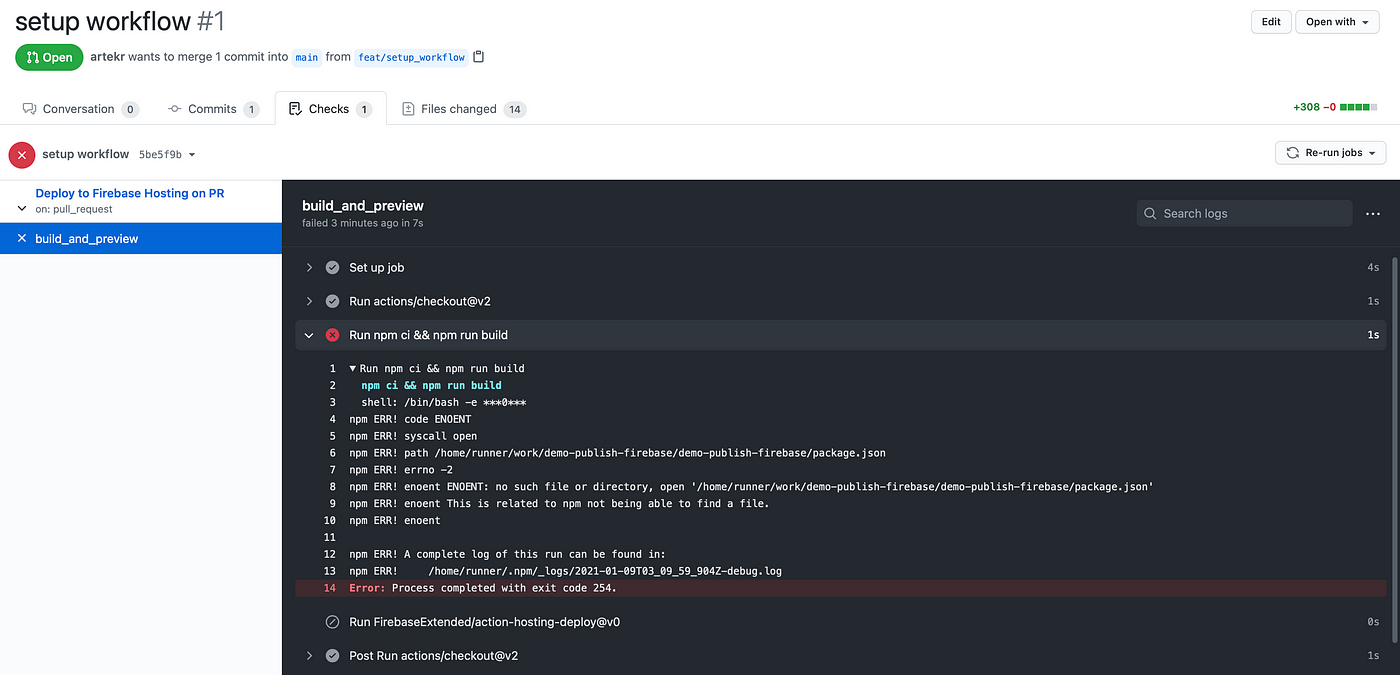
Recall one of the question during the firebase host setup prompts.
? What script should be run before every deploy? npm ci && npm run build We leave information technology as the default one. This is set in the GitHub Deportment config files in our projection. Since nosotros will build and generate our website using Publish locally, so push the total site to the repo, we don't need GitHub Actions to do extra build step for us. Open the github config files nether .github/workflows/firebase-hosting-*.yml. Comment out the command - run: npm ci && npm run build in both files.
          - uses: actions/checkout@v2
# — run: npm ci && npm run build
Commit and push the changes to the remote branch. Go to Actions tab of your repo, await for the workflow to consummate.
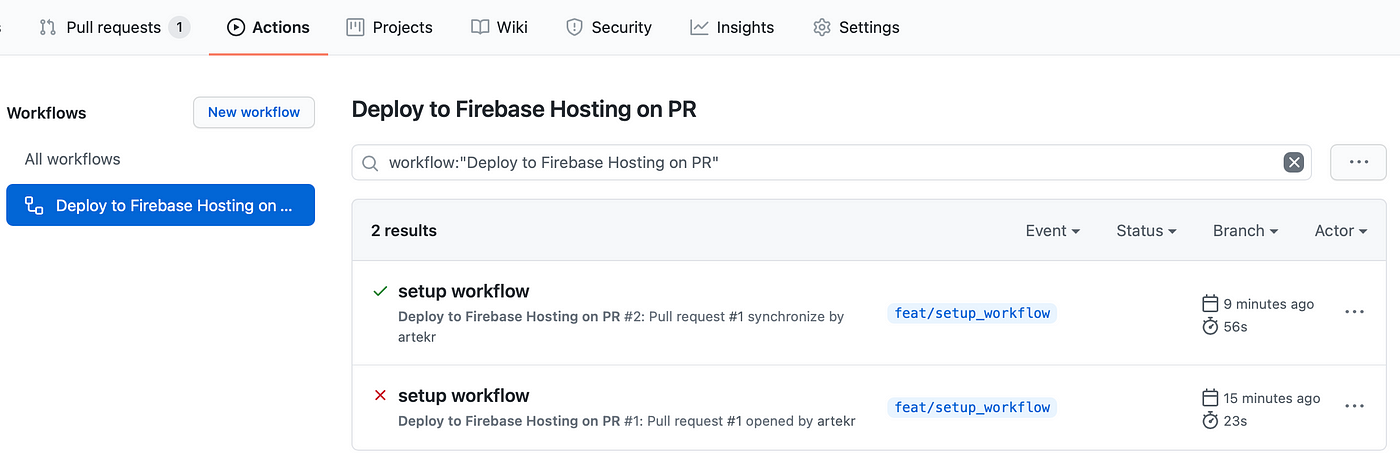
Y'all will see the latest workflow has completed with the green check mark! Go back to your pull request page, you lot volition meet github-actions bot has added a comment with the preview URL of your website!
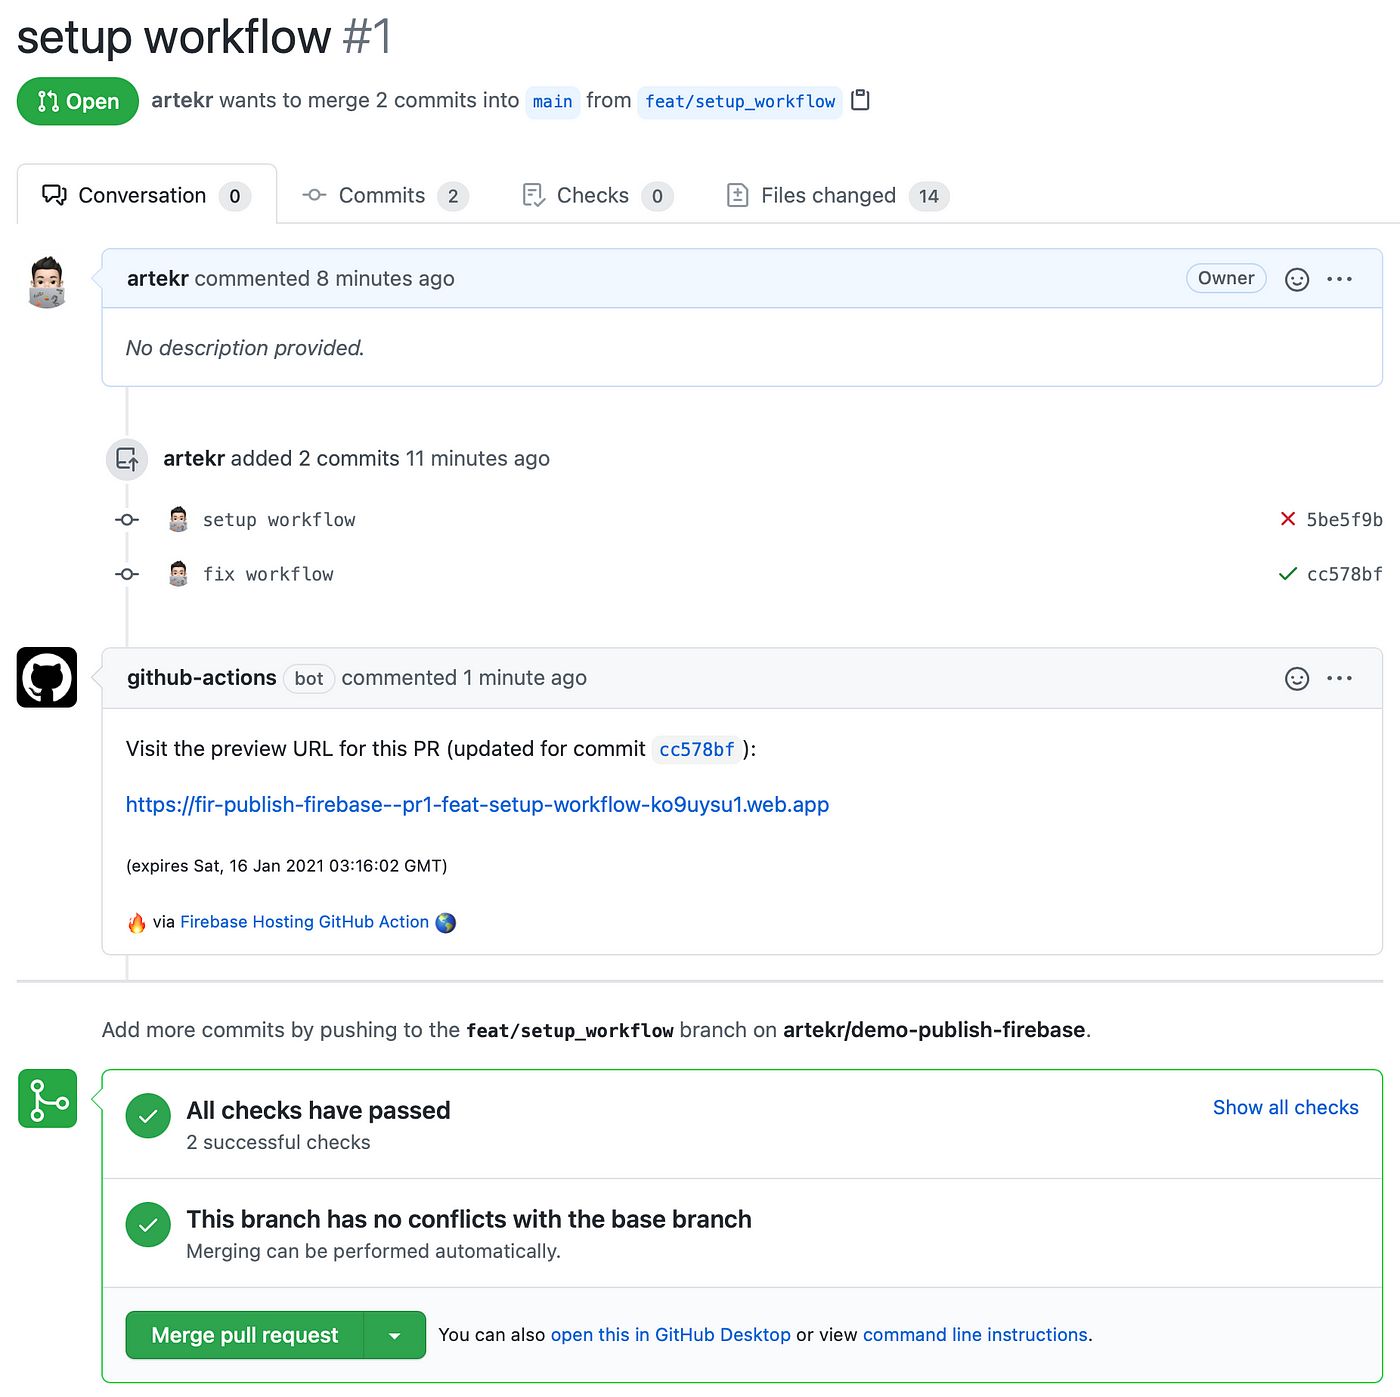
Click the link and information technology volition open your new website in the browser. Awesome!

Step 4 — Merge pull request to trigger production deployment
Nosotros are just i-click abroad to bring the website alive in production! Feel costless to make any changes of the website and push to the pull request. Click Merge pull asking button to merge your pull request to the main branch. Annotation this will trigger another workflow in GitHub Actions. Go to the Actions tab and monitor the build progress.
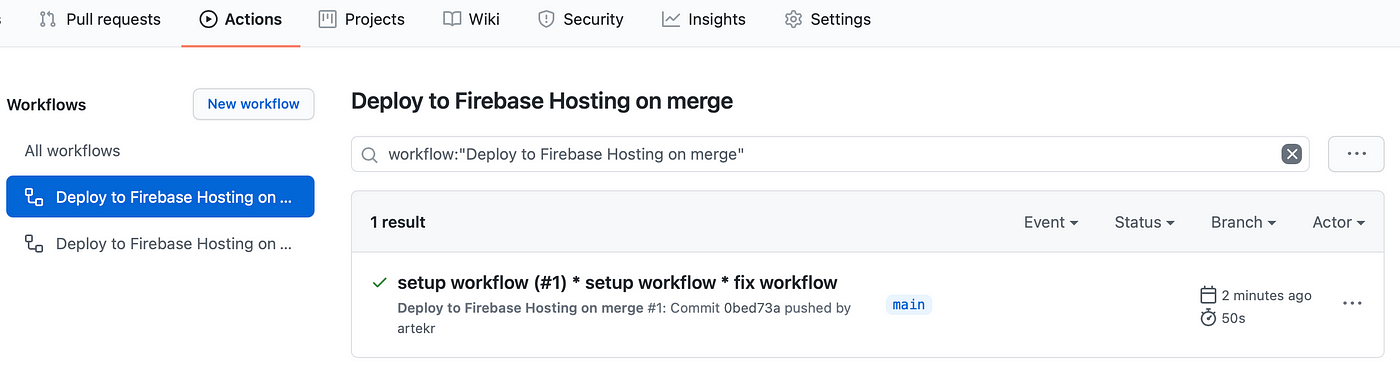
Once the build progress completed, navigate to the Hosting folio of your Firebase project and you volition find a new release of your project deployed past GitHub Actions. Additionally, Firebase Hosting provides you two default domains to access your website. If you desire to use your own domain, Firebase Hosting also provides the style by but click the Add custom domain push button.
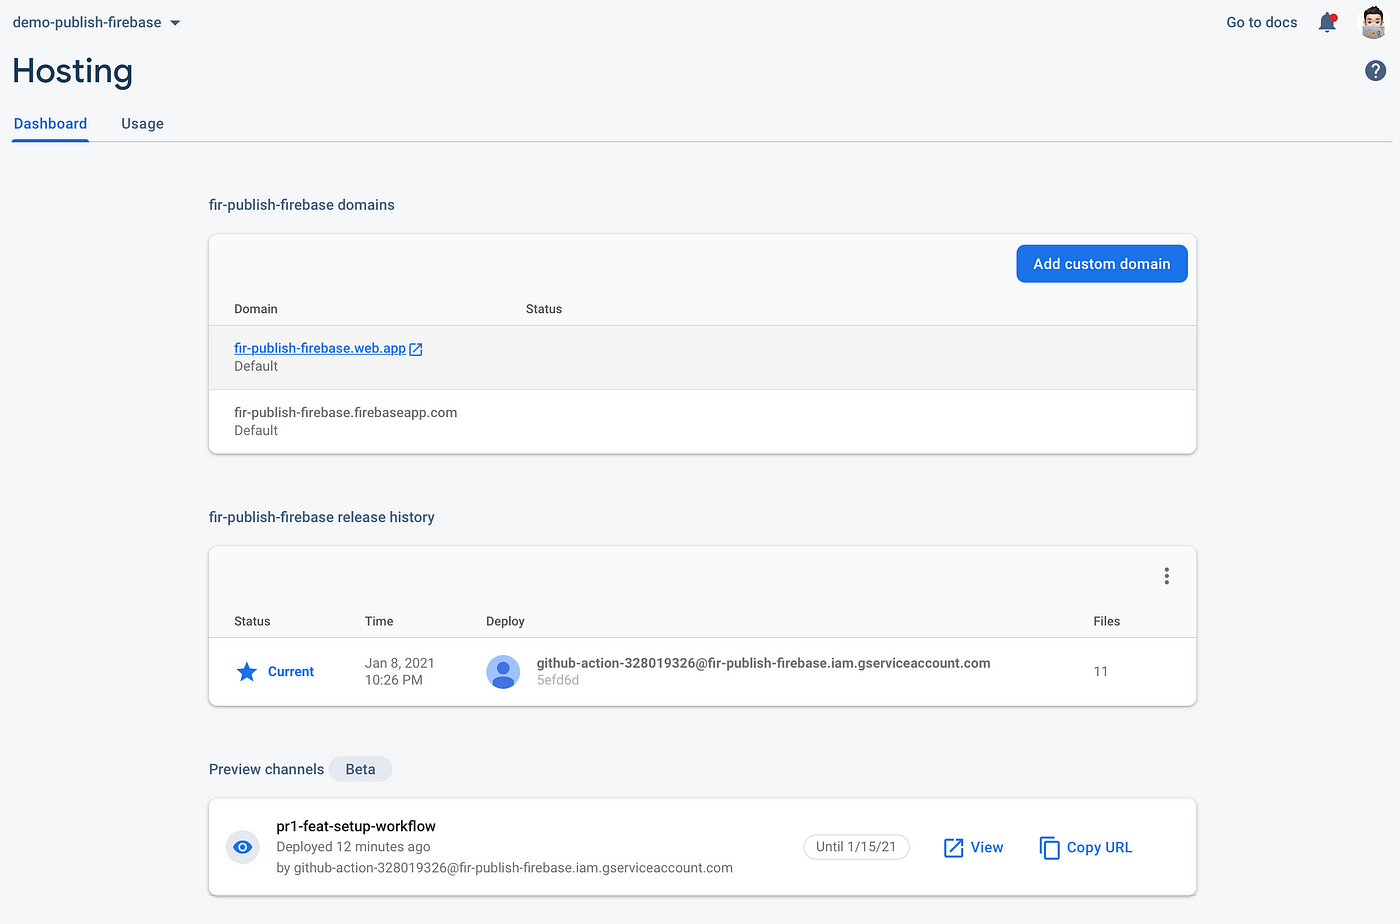
Click either of the domains to access your website in production. Congratulations, you have setup a fully functional CI/CD pipeline through GitHub Actions so that you tin focus on your content delivery! 😄

Decision
From this tutorial, we started from goose egg past creating a brand new personal website projection using the static site generator Publish, which lets you build your unabridged website using Swift thanks to John Sundell. Then we integrated GitHub Deportment to the project for car deploying your website to Firebase Hosting. We've also exercised creating a pull asking to preview the changes of your website before publishing them in public.
You can check the demo repo for this tutorial here. In the concurrently, you can too visit my personal website which uses the aforementioned techniques mentioned in this tutorial at https://wangheng.ca.
Happy coding!
References
- Deploy to live & preview channels via GitHub pull requests
- Firebase Hosting GitHub Action
- Publish — the static site generator enales you to build your entire website using Swift
You lot tin find my original post here:
Source: https://hengwang.medium.com/automatically-deploy-your-website-to-firebase-hosting-with-github-actions-76d7a8598a5e
0 Response to "what do you want to use as your public directory firebase storage"
Postar um comentário